
Bubbles: Breaking Down Complex Journeys With Single-Responsibility Orchestrators
An overview of an architectural approach for converting complex journeys into single-responsibility "bubbles" in Flutter.


Heads up, this is a slightly longer post than usual! Technical implementation details can be found in the second section.
Introduction
This post outlines an architectural approach developed to tackle a complex codebase in an app that – over time and through many hands – grew messy. Team structures shifted, documentation vanished, and we were left with tangled code we struggled to understand.
We chose to invest in building something cleaner, modular, and more approachable than what we had inherited. This is a look at how we broke down this complex codebase into something simple enough to hold in your head.
Keywords
To communicate effectively, we need to speak the same language. Here are some key terms used throughout:
Journey: any relatively complex flow in an application. It consists of a series of steps a user must complete. In our case these steps were jumped together behind the scenes.
Bubble: a smaller section of a journey. Users enter a bubble, complete a series of steps, then exit. Think of it as a chapter in a larger story. For example, entering and verifying a password would be a “bubble”.
Orchestrator: a finite-state machine that tracks the current state of a bubble and spans over the entire journey. It holds the business logic needed to move between states and handle errors. Its state is always clear and predictable. In Flutter terms, this would be a Bloc or a Cubit.
Background
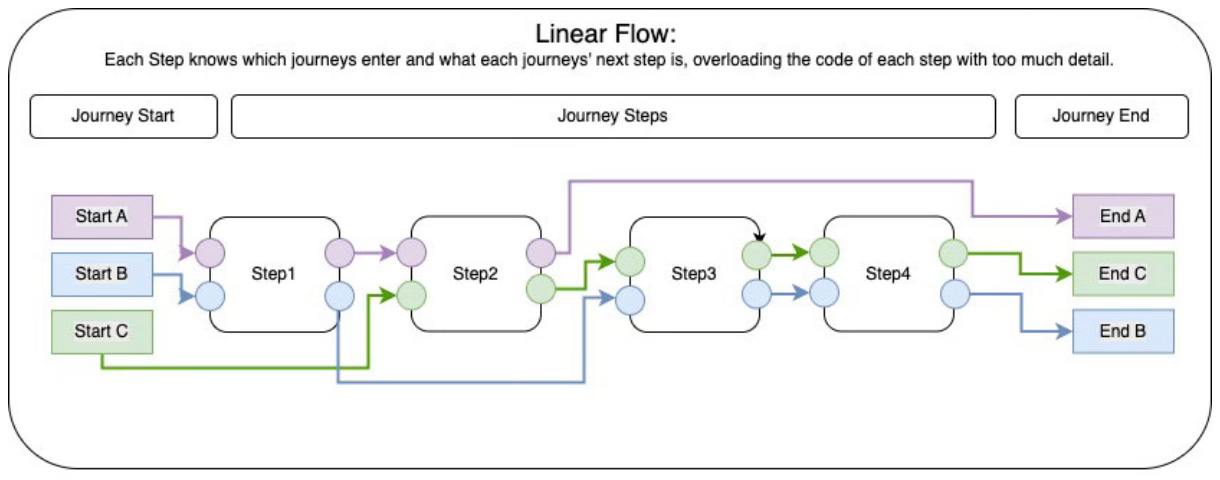
We inherited a legacy codebase with multiple journeys, each using all or some of the same eight tightly coupled steps. These steps reacted not only to their own internal states but also to shared global events like network connectivity and permission changes. While the journeys themselves were fairly short, their structure made them almost impossible to understand.
Static variables controlled behaviour, states were influenced by forgotten singletons lingering in memory, and following the flow often meant sketching it out on a large sheet of paper.
Spaghetti States and Messy UIs
Each journey was made up of a few screens with vague names, often responding to multiple cubit streams at once. This gave developers a false sense of control — until a screen suddenly re-rendered with entirely different results.
Some events were emitted asynchronously, and issues unrelated to a screen’s context could trigger odd behaviours and regressions that were difficult to trace. The rules, so to speak, were unclear and constantly shifting.
Debugging Nightmare
Like an overgrown garden, the codebase had evolved over a long time, accumulating duplicate code, shared state, and unclear ownership of logic. Helper methods with almost identical names and behaviour were scattered throughout like weeds.
Making changes became painful. No one had “tended the garden” in so long that even the smallest update could cause unexpected side effects. Debugging the tangled mess of state changes was a punishment in itself.
Opaque Journey State
State transitions were never clearly modelled, making it hard to tell which step of the journey the user was in at any moment. Logging tools were useless, as the code often triggered multiple re-renders, creating more noise than insight.
Writing deterministic tests was, at best, a challenge. We even found damning evidence of excessive use of generated mocks mixed with another testing approach. This Frankenstein-like method gave the illusion of coverage while testing the bare minimum.
Proposed Solution: Orchestrator Flow
We quickly realised that adding anything to the existing codebase was unwise. Instead, we set out to design an architecture tailored to the needs of multiple journeys — something structured, clean, and simple enough to hold in your head. Where the old code was noisy and chaotic, the new should be clean-cut and quiet.
Our guiding principle was simple: break each journey into smaller, manageable bubbles — each one an isolated, focused step.
A user would enter a bubble, complete a task, then move on. When the functionality aligned, bubbles could be reused across different journeys.
Core principles of the approach:
A large journey is broken into self-contained chunks called bubbles.
Each bubble has a single, abstract goal—e.g. capture, verify, and save a password.
A bubble governs its own state, handles its own errors, and works independently to achieve its goal without reaching beyond its boundary.
Each bubble maps to a single page. That page can render as many views as needed to complete the task, meaning the UI adapts within a fixed location.
Bubbles are ephemeral. They have no memory and must not persist beyond their purpose. Once complete, they’re “popped”. Any data must be saved externally (e.g. to local storage or a database).
Bubbles can use as many internal state management layers as needed to stay modular and simple—though fewer is better.
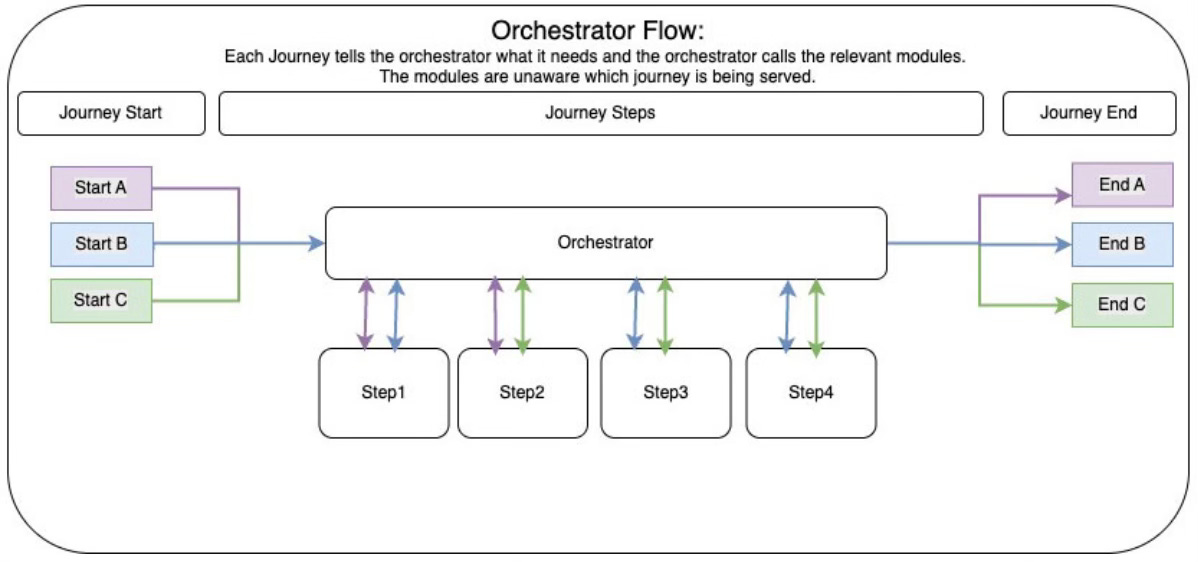
In rare cases, bubbles can “call the parent”—the journey orchestrator—for help. The parent decides how to respond, but bubbles are encouraged to resolve issues on their own.
The orchestrator manages the lifecycle of a bubble. It comes into existence, guides the bubble to achieve its goal, and then disappears. Its structure is deliberately minimal, offering a clear view of the bubble’s current state — whether it’s loading assets, requesting confirmation, processing data, or handling an error.
The orchestrator presents a view to the user. Once that view completes its task, it notifies the orchestrator, which then decides what to show next. This flow is clearly defined in the cubit’s structure, along with each state it emits along the way.
Right Size, Right Complexity
Because each bubble had a clear goal, its size and complexity could be easily measured and controlled.
Each step was only as complex as necessary—ranging from a simple stateless page to cubits managing sub-views to complete the task. You should always know what state the bubble is in and what it is doing.
Scoped State Management
The orchestrator creates one page and manages various views within it with the following characteristics:
They could range from a simple button to a complex data-entry form.
To keep the structure organised, each view could have its own cubit, fully decoupled from the rest of the bubble.
This isolated logic and made maintenance easierViews could not interact with others outside themselves.
They performed their specific task and communicated with the orchestrator when needed, remaining otherwise isolated.
When a view completed its task, it informed the orchestrator, which then updated the bubble’s state and replaced the view with the next one.
This structure made it easy to understand what was happening on screen at any moment. Knowing the current state gave a clear idea of what the user saw — especially useful when interpreting logs.
Predictable Flow
With this structure, each step was predictable, testable, and easy to debug in isolation. You always knew where the user was on the journey and which logic was active. You could zoom in from the bubble level right down to the view’s internal logic.
Since you no longer needed to track dozens of states and variables beyond your current focus, you could easily run a complex bubble in your head. Knowing a single state led you confidently through a clear path of what the user should see next.

Deep Dive Example: A Delivery Journey
Here’s a hands-on deep dive on how to apply this architecture to your codebase.
We chose the checkout sequence in the delivery journey as our example for a simple reason: it’s a multi-step process everyone uses. Apps like Deliveroo and Just Eat serve millions daily. This familiar, sequential flow provides an ideal example of how to break a complex process into isolated, single-responsibility parts to create a clean, predictable, and maintainable system.
If you want to skip ahead and just get the code, here’s the link to the repository.
Example Structure
Referring back to our earlier definitions:
Journey: our example features one journey—the checkout process for a delivery.
Bubble: this linear journey has distinct, essential chapters:
The Basket: focused on items, quantities, and totals.
The Delivery Details: a self-contained task involving user input, validation, and possibly asynchronous map lookups.
The Payment: a critical, isolated interaction with a third-party service, complete with unique failure modes.
Each step fits perfectly as a bubble, with a clear goal, its own logic, and potential reuse in other journeys.
Orchestrator: The orchestrator tracks progress and ensures bubbles appear in order - and most importantly, it enforces explicit hand-offs. You can’t move to payment without confirming the address, and success only appears after payment is processed.
A Bubble Example: The Delivery Details
Let’s zoom in on a single bubble. A bubble is a self-contained unit representing one step in a larger journey. It can stand alone as a journey or be managed by an orchestrator when multiple journeys are combined.
In our delivery app, the Delivery Details screen is a perfect example. Its sole goal is to capture and confirm a valid delivery address.
Each bubble includes its own views, states, and cubit.
Let’s begin by defining the states for our Delivery Details bubble.
(If you want to skip ahead to the code you can check it out at this link.)
import 'package:equatable/equatable.dart';

abstract class DeliveryDetailsState extends Equatable {
  const DeliveryDetailsState();
  @override
  List<Object?> get props => [];
}

// State when the screen is first shown, before any user interaction.
class DeliveryDetailsInitial extends DeliveryDetailsState {}

// State while we are actively validating the address (e.g., calling an API).
class DeliveryDetailsLoading extends DeliveryDetailsState {}

// State when the address is successfully verified and confirmed.
// This is the "signal" state that tells the orchestrator we are done.
class DeliveryDetailsSuccess extends DeliveryDetailsState {
  final String confirmedAddress;
  final double finalDeliveryFee;
  // ...
}

// State when something went wrong during verification.
class DeliveryDetailsError extends DeliveryDetailsState {
  final String message;
  // ...
}
Notice how specific these states are. The main orchestrator doesn’t need to know about DeliveryDetailsLoading — that’s handled entirely within the bubble, keeping the high-level flow clean and simple.
Now, onto the cubit. The cubit holds the bubble’s logic. It manages interactions with repositories and updates the UI by emitting states. It processes user input, performs actions (such as calling use cases), and sends new states to the UI.
class DeliveryDetailsCubit extends Cubit<DeliveryDetailsState> {
  // It depends on the use case from the domain layer.
  final ConfirmDeliveryAddress _confirmDeliveryAddress;

  DeliveryDetailsCubit({required ConfirmDeliveryAddress confirmDeliveryAddress})
    : _confirmDeliveryAddress = confirmDeliveryAddress,
      super(DeliveryDetailsInitial());

  // This is the main action this bubble can perform.
  Future<void> confirmAddress(String address) async {
    if (address.isEmpty) {
      emit(const DeliveryDetailsError("Address cannot be empty."));
      return;
    }

    // Inform its own UI that it's busy.
    emit(DeliveryDetailsLoading());

    try {
      // Execute the business logic via the use case.
      final DeliveryAddress confirmedAddress = await _confirmDeliveryAddress.execute(address);

      // Emit the success state with the result. This is its goal!
      emit(DeliveryDetailsSuccess(...));
    } catch (e) {
      // If something goes wrong, emit an error state for its UI to handle.
      emit(DeliveryDetailsError(...));
    }
  }
}
The DeliveryDetailsCubit is the engine of our bubble. It handles the heavy lifting and tells the view exactly what to display at each moment.
With the state and cubit defined, we can now build a basic view that uses them. The view listens to state changes and renders the appropriate widgets.
class _DeliveryDetailsFormState extends State<_DeliveryDetailsForm> {
  // ...
  @override
  Widget build(BuildContext context) {
    return BlocConsumer<DeliveryDetailsCubit, DeliveryDetailsState>(
      listener: (context, state) {
        // We'll get to this magical part in the next section.
      },
      // The BUILDER rebuilds the UI based on the bubble's internal state.
      builder: (context, state) {
        final isLoading = state is DeliveryDetailsLoading;

        return Padding(
          padding: const EdgeInsets.all(16.0),
          child: Column(
            // ...
            children: [
              const Text('Enter Your Delivery Address', ...),
              const SizedBox(height: 24),
              TextField(
                // The form is disabled while loading.
                enabled: !isLoading,
                // ...
              ),
              const SizedBox(height: 20),

              // If the state is 'Loading', show a spinner.
              if (isLoading)
                const Center(child: CircularProgressIndicator())
              else
                // Otherwise, show the button.
                ElevatedButton(
                  onPressed: () {
                    // Forward the user's tap to its own cubit.
                    context.read<DeliveryDetailsCubit>().confirmAddress(
                          _addressController.text,
                        );
                  },
                  child: const Text('CONFIRM ADDRESS'),
                ),
              // ...
            ],
          ),
        );
      },
    );
  }
}
When the user taps the “Confirm Address” button, the view stays simple. It locates its DeliveryDetailsCubit in the context and calls the confirmAddress method, passing the user’s input.
This creates a neatly self-contained component. The view renders according to its state, and user actions update that state through the cubit — all within the bubble’s own scope.

An Orchestrator Example: The Delivery Journey
The last section raised an important question: how does an isolated bubble tell the main journey orchestrator that it’s done and ready to move on? This leads us to the next part of the system.
If a bubble is a self-contained task item within a journey , the orchestrator is the manager of those tasks. Its role is not to act directly but to manage the sequence of views and data flows required to chain all bubbles together to complete the journey. . It understands the app’s high-level goals and guides the user from bubble to bubble.
In our app, the DeliveryJourneyOrchestrationCubit doesn’t validate addresses or process payments—it simply knows that the “address” journey precedes the “payment” journey.
Let’s start building the orchestrator.
The Orchestrator States
import 'package:equatable/equatable.dart';

// Abstract base class
abstract class DeliveryJourneyOrchestrationState extends Equatable {
  const DeliveryJourneyOrchestrationState();
  @override
  List<Object?> get props => [];
}

// The high-level steps of our flow:
class DeliveryJourneyOrchestrationStateBasket extends DeliveryJourneyOrchestrationState {}
class DeliveryJourneyOrchestrationStateDeliveryDetails extends DeliveryJourneyOrchestrationState {}
class DeliveryJourneyOrchestrationStatePayment extends DeliveryJourneyOrchestrationState {}
class DeliveryJourneyOrchestrationStateSuccess extends DeliveryJourneyOrchestrationState {}
// ... plus initial and failure states
With these explicit states, there’s no ambiguity. The system is always in one well-defined step, removing the need to decode complex booleans or conditions to know the user’s place in the flow.
The Orchestrator Navigation
To make the orchestrator flexible, we’ll refactor it to be data-driven. The journey’s flow will be defined by simple data structures, not hard-coded logic.
First, we need a single, type-safe source of truth for all possible steps. An enum fits perfectly, providing a clear, readable, and finite list of bubbles.
This Bubbles enum becomes the core identifier for each step, replacing magic strings and ensuring compile-time safety.
/// Represents the different stages or "bubbles" within a delivery journey.
///
/// Each enum value corresponds to a distinct part of the user's flow
/// through the delivery process.
enum Bubbles {
  /// The initial stage where items are selected and reviewed.
  basket,

  /// The stage where delivery address details are entered and confirmed.
  deliverydetails,

  /// The stage where payment information is provided and processed.
  payment,

  /// The final stage indicating the successful completion of the journey.
  completed
}
With our steps defined, we can now configure the orchestrator's Cubit to use this enum. We'll use two simple data structures to define the entire flow: a List for the sequence and a Map for the state lookup.
The State Mapping (
bubbleStatesMapping): A Map connects each Bubbles enum value to the specificDeliveryJourneyOrchestrationStatethat should be emitted for that step. This decouples the navigation logic from the state objects themselves.
 final Map<Bubbles, DeliveryJourneyOrchestrationState> bubbleStatesMapping = {
    Bubbles.basket: DeliveryJourneyOrchestrationStateBasket(),
    Bubbles.deliverydetails:
        DeliveryJourneyOrchestrationStateDeliveryDetails(),
    Bubbles.payment: DeliveryJourneyOrchestrationStatePayment(),
    Bubbles.completed: DeliveryJourneyOrchestrationStateSuccess(),
  };
The Journey Sequence (
bubbleOrder): A simple List defines the exact order of the journey. This is our blueprint. Reordering steps or inserting new ones is as easy as modifying this list.
 final List<Bubbles> bubbleOrder = [
    Bubbles.basket,
    Bubbles.deliverydetails,
    Bubbles.payment,
    Bubbles.completed,
  ];
In the example you can see that we’ve ordered the basket bubble to show first and the completed bubble to show as the last.
This data-driven setup allows our navigation methods to be beautifully generic. The cubit logic is now minimal and concerned only with traversing the bubbleOrder list, not with any specific step.
The journey starts when a user calls startJourney(). This will assign the local variable bubbleType to the first bubble in the bubbleOrder list and emit the first state in the bubbleStatesMapping.
Going to the next journey and previous journey is also quite similar where we simply update the value of bubbleType with either the next or previous bubble in the bubbleOrder list and emit the state associated with it in bubbleStatesMapping.
Each method's only job is to emit a new state.
  void startJourney() {
    bubbleType = bubbleOrder.first;
    emit(bubbleStatesMapping[bubbleType]!);
  }

  void goToNextJourneyStep() {
    if (bubbleOrder.indexOf(bubbleType) == bubbleOrder.length - 1) {
      handleFatalError();
      return;
    }
    bubbleType = bubbleOrder[bubbleOrder.indexOf(bubbleType) + 1];
    emit(bubbleStatesMapping[bubbleType]!);
  }

  void goToPreviousJourneyStep() {
    if (bubbleOrder.indexOf(bubbleType) == 0) {
      handleFatalError();
      return;
    }
    bubbleType = bubbleOrder[bubbleOrder.indexOf(bubbleType) - 1];
    emit(bubbleStatesMapping[bubbleType]!);
  }

  void handleFatalError() {
    print("ORCHESTRATOR: A fatal error occurred.");
    emit(DeliveryJourneyOrchestrationStateFatalFailure());
  }
All complex business logic is delegated to the individual bubbles. The orchestrator remains a simple, readable, and highly predictable state machine.
The Orchestrator Page Setup
With the cubit now in place - we can see what the orchestrators’ UI looks like.
A dedicated page widget, DeliveryJourneyPage, listens to the orchestrator. It uses a BlocBuilder to react to state changes, and its sole function is to render the correct bubble (widget) for the current state.
//...
body: BlocBuilder<DeliveryJourneyOrchestrationCubit, DeliveryJourneyOrchestrationState>(
  builder: (context, state) {
    // This switch statement maps each high-level state to a specific UI bubble.
    switch (state) {
      case DeliveryJourneyOrchestrationStateBasket():
        return Center(/* ... Basket UI ... */);

      case DeliveryJourneyOrchestrationStateDeliveryDetails():
        // When the state is DeliveryDetails, render that bubble.
        return const DeliveryDetailsConfirmationView();

      case DeliveryJourneyOrchestrationStatePayment():
        // When the state is Payment, render that bubble.
        return const PaymentWidget();

      case DeliveryJourneyOrchestrationStateSuccess():
        return const Center(child: Text("🎉 Order Confirmed! 🎉"));

      default:
        return const Center(child: CircularProgressIndicator());
    }},),
//...
This structure makes the entire application flow visible in one place. Changing the journey's order is a matter of changing how the orchestrator's transition methods are called, not rewriting complex UI logic.
How a Bubble Talks to the Orchestrator
This clean separation is effective, but it leaves one critical question unanswered: How does the orchestrator know when to call goToPayment()? Since the DeliveryDetails bubble operates in isolation, there needs to be a clear mechanism for it to signal its completion back to the orchestrator.
Here we can discuss how the orchestrator communicates with each bubble and vice versa.
The communication is a clean, two-part contract:
Orchestrator to Bubble: The orchestrator's job is to put a bubble on the screen when it's that bubble's turn to perform.
Bubble to Orchestrator: The bubble's job is to signal back to the orchestrator only when its single task is complete.
So now let’s look at that in the code.
Communication from Bubble to Orchestrator: The Hand-Off
This is the most critical piece of the pattern. The bubble needs to tell the orchestrator, "My job is done, you can move to the next step." It does this using the listener function of a BlocConsumer.
The listener is perfect for this because it's designed for "side-effects"—actions that should happen once in response to a state change, like showing a dialog, logging an event, or, in our case, telling another component to do something.
Here’s the BlocConsumer inside our DeliveryDetails bubble.
// ...
return BlocConsumer<DeliveryDetailsCubit, DeliveryDetailsState>(
  // The LISTENER waits for a specific state from ITS OWN cubit.
  listener: (context, state) {
    // We only care when the bubble's goal is achieved.
    if (state is DeliveryDetailsSuccess) {
      // *** THIS IS THE HAND-OFF ***
      // 1. Show a local success message. This is the bubble's own business.
      ScaffoldMessenger.of(context).showSnackBar(
        SnackBar(
          content: Text('Address Confirmed: ${state.confirmedAddress}'),
          backgroundColor: Colors.green,
        ),);
      // 2. Find the orchestrator in the widget tree using context.read()...
      final journeyOrchestrator = context.read<DeliveryJourneyOrchestrationCubit>();
      // 3. ...and call its public method to advance the journey.
      journeyOrchestrator.goToNextJourneyStep();
    }},
  builder: (context, state) {
    // The builder just builds the UI for the bubble.
    // ...
  },
);
This is a clean, one-way signal. The DeliveryDetails bubble doesn't know what the next step is, nor does it care. It simply finds the DeliveryJourneyOrchestrationCubit provided higher up in the widget tree and invokes the goToNextJourneyStep() method. Its responsibility ends there.
Communication from Orchestrator to Bubble
The communication in this direction is even simpler. The orchestrator doesn't talk to the bubble directly with methods or events. Instead, it brings the bubble into existence.
When the orchestrator emits a new state, like DeliveryJourneyOrchestrationStateDeliveryDetails, the main DeliveryJourneyPage rebuilds and puts the DeliveryDetailsConfirmationView widget on the screen.
// ...
body: BlocBuilder<DeliveryJourneyOrchestrationCubit, DeliveryJourneyOrchestrationState>(
  builder: (context, state) {
    switch (state) {
      // ...
      case DeliveryJourneyOrchestrationStateDeliveryDetails():
        // The orchestrator's state change causes this bubble to be built.
        // This IS the communication.
        return const DeliveryDetailsConfirmationView();
      // ...
    }
  },
),
// ...
This action is the communication. The orchestrator is effectively saying, "It's your turn now," by instantiating the bubble. When the DeliveryDetailsConfirmationView is later replaced by the PaymentWidget, the old bubble, its Cubit, and all of its internal state are disposed of, ensuring perfect encapsulation.
When is it applicable?
This loosely-coupled communication contract is fundamental to the architecture’s maintainability. Each component has a well-defined and limited responsibility, and their interactions are predictable and easy to follow.
By allowing each “bubble” to manage its own domain, you replace a tangled web of dependencies with a clean, linear flow. This clear separation of concerns makes the system much easier to maintain.
That said, not every application can be neatly divided into self-contained bubbles — especially when numerous edge cases span multiple user journeys. However, it’s worth considering a certain level of code duplication if it allows each bubble to remain self-contained.
The result is a system that is not only robust and scalable but also simple enough to understand and reason about entirely in your head.
 | A guest post by
|
 | A guest post by
|